To get started with configuring a Smart Link :
Select Smart Links in the left navigation.
Then select the submenu item Smart Links Builder
Next you will see a list of all created Smart Links which will include a Smart Link designed by default with the recommended default configurations. Select one of these Smart Links to modify them or select " + Create New Smart Link " action button located in the top right of the Smart Links Builder.


Configuring the Smart Link Builder page
After creating a new Name for a Smart Link you will then want to design the experience you want a customer to have upon selecting the links.
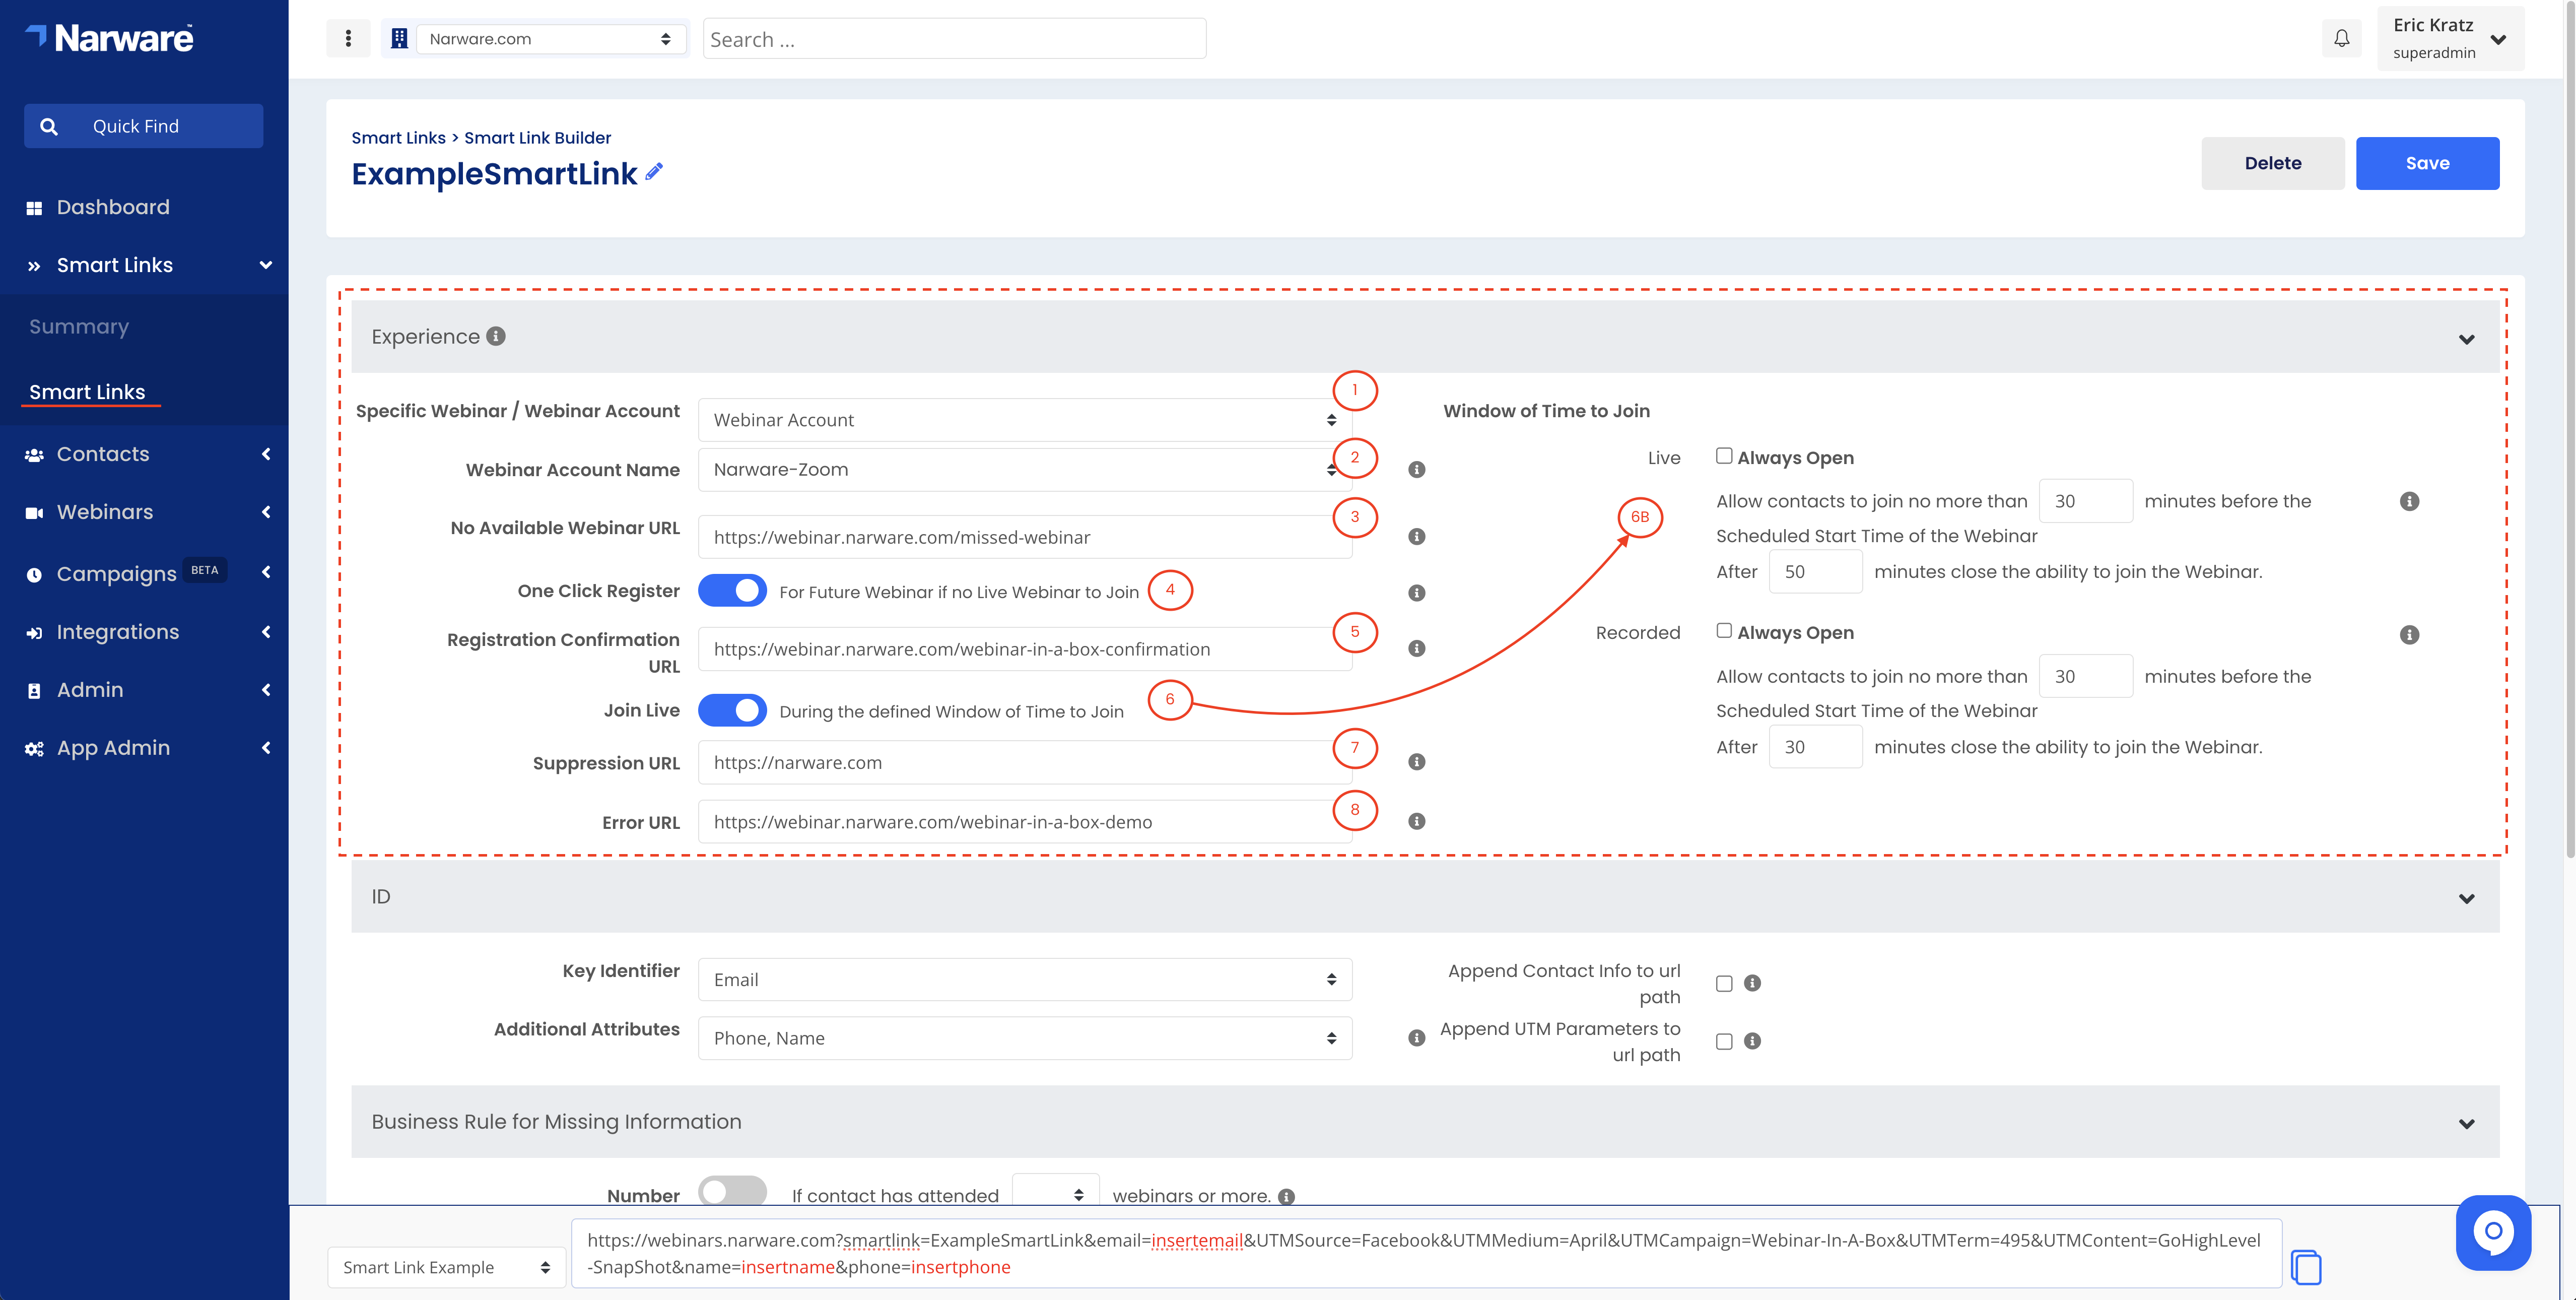
Select Specific Webinar or Webinar Account

After selecting the Specified Webinar or Webinar Account in the field above, the proceeding field will dynamically adapt to your selected option.
By selecting Webinar Account you will be required in (2) to select from your connected accounts. This configured link solution is designed to Join or Register contacts for the next available webinar scheduled for the selected account.
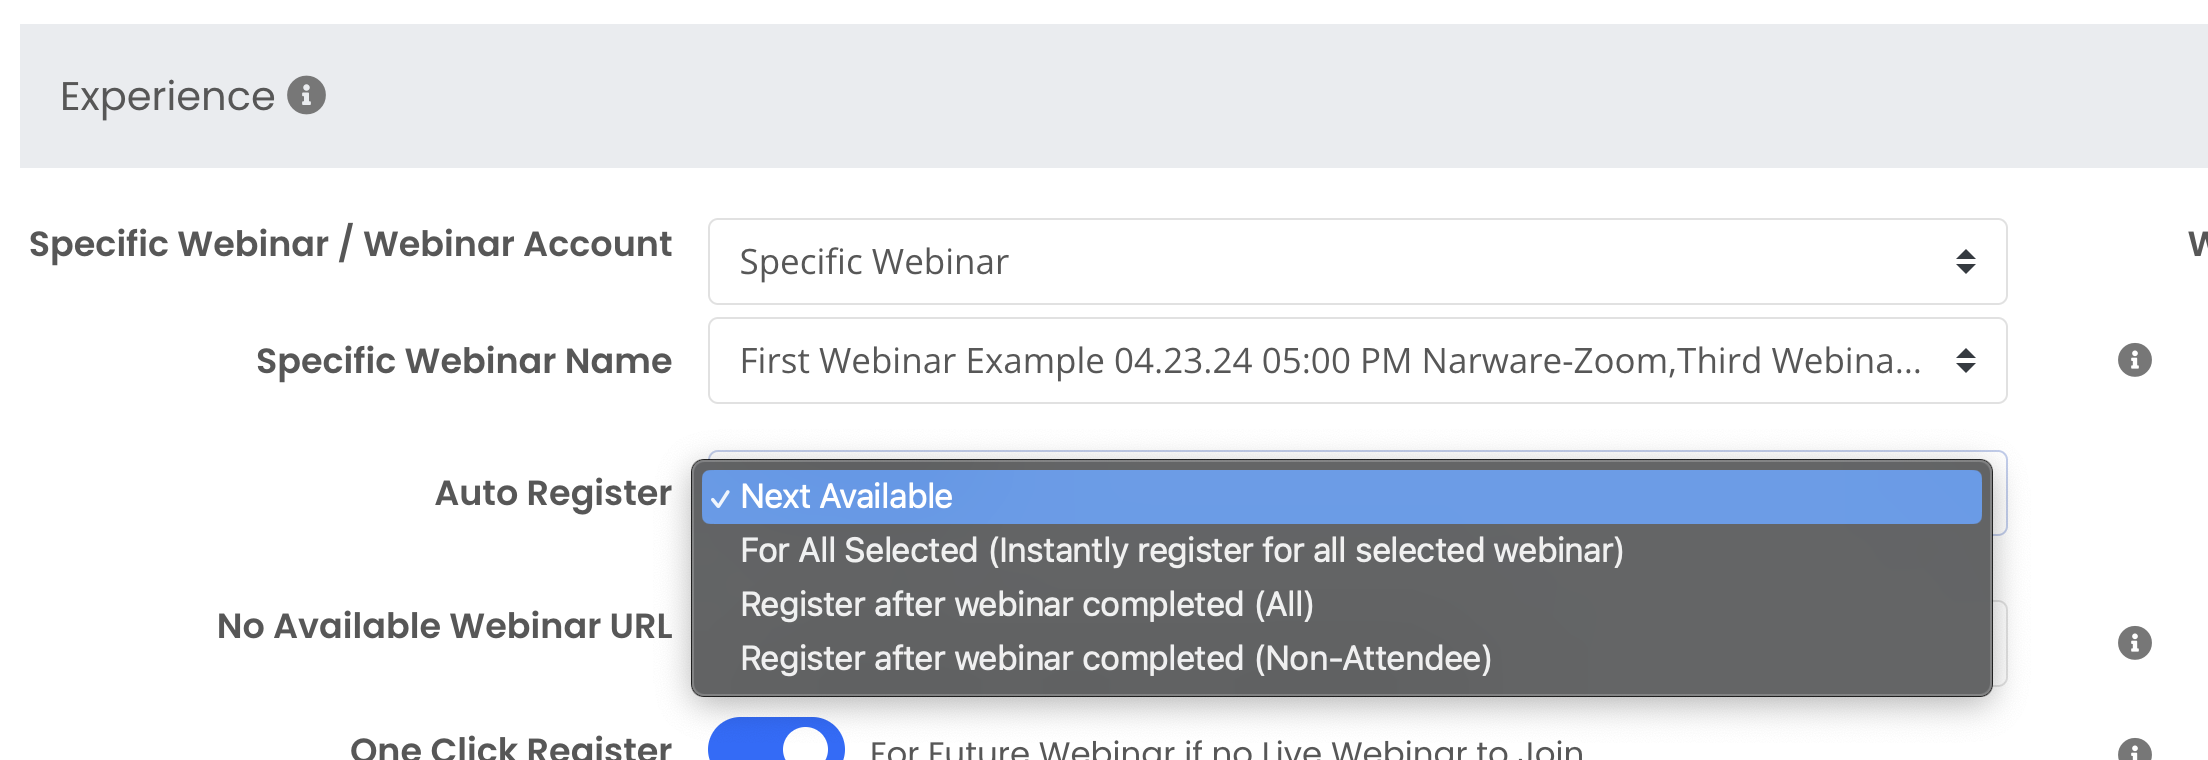
By selecting Specific Webinar the configured link is designed to register or join contacts to the webinars selected. Multiple webinars can be selected and if multiple webinars are selected a user can then define based on the different scenarios when or how a customer will be registered for the webinars checked.
When selecting multiple webinars the "Auto Register" dropdown will become available to define how contacts will be registered for the multiple webinars. The options include:
• Next Available : This option will register contacts for the next webinar scheduled to occur.
• For All Selected (Instantly register for all selected webinars) : this option will register the contact selecting the link for all of the webinars that are selected and occur in the future.
• Register after webinar completed (All) : this option will register for each of the next webinars in a que like fashion waiting for the previous to complete before registering for the next automatically.
• Register after webinar completed (Non-Attendee): this option will continue to register the contact for the next webinar after the previous webinar is completed and continue to do so until the contact attends one of the selected webinar or there is no more webinars to register for.
Define the No Available Webinar URL
By defining this url you are providing a path for contacts to be directed to in the event there is no available webinar to Join or Register for.

Note : We recommend this page be some sort of bump offer and/or a recording link to a previous recorded webinar.
Turn Off/On the One Click Register
By turning this feature On when a contact selects the link the contact will be registered for the Specified Webinar or the Next scheduled webinar of the selected Webinar Account.
By turning this feature Off the link will not register contacts for any defined or future scheduled webinars.
Define the Registration Confirmation URL
If One Click Register is turned Off you will not be required to provide a Registration Confirmation URL
If it is turned On then you will want to define a landing page that contacts will be directed to upon completion of being registered for a webinar.


Turn Off/On Join Now
By turning off Join Now the link will not join a contact into a webinar.
By turning on Join Now if a contact selects the link they will be joined into a ongoing webinar if they click the link during the “Window of Time to Join


Define the Suppression URL
The Suppression URL is a URL that contacts will be directed to in the event their assigned tags do not match the required tags or they match the Suppression tags. These can be configured at the bottom of the Smart Link page.

ID (Key Identifier)
In the ID section a user must define how the link will identify the contact selecting this link. This is most commonly done by utilizing the variable code of the third parting mailing or messaging platform being used for distributing the copied link that includes the Contacts Email or CRM ID. The Key Identifier also includes an option to not include an identifier by selecting Open. This solution is most commonly used for posting the link where organic traffic may be generated such as a Social Media page or a public facing page or a solution where an email may not be available to use such as a text messaging solution.
In order to define the Key Identifier, locate the ID section on the Smart Link Builder page created in the dropdown list labeled as Key Identifier select from Email, CRM ID, or Open.

By selecting Email the link will require that the Contact who is receiving the Smart Link has the contacts email inserted into the link (most common). Narware will then associate the Contact to a related record or create a new record if no related contact is found within Narware and sync to the connected CRM using the Email.
By selecting CRM ID the link will require that the Contact who is receiving the Smart Link has the contacts CRM ID of the integrated CRM to Narware inserted into the link. Narware will then associate the Contact to a related record or create a new record if no related contact is found within Narware and sync to the connected CRM using the CRM ID.
By selecting Open the link will not require that any contact information is inserted into the link. When using open the Contact will not have any actual identifiable information and an anonymous contact record will be created with a made up email with this email structure *unique-value*@join-now.ai that will allow them to be joined into a webinar.
NOTE: a contact created in Narware with this made up email will not be added to your connected CRM until the email is updated with a valid email address.!Important! In all of these scenarios (Email, CRM ID, Open) the contacts browser will be cookied and any future use of a Narware Smart Link will be directly associated with these created records to maintain a contacts history of clicks and assure updates of the appropriate records. Also if the contacts browser was already cookied Narware will then find the original Contact record related to that cookie to identify the contact and update that original contact record.
Additional Attributes
For more advanced Identification of your contacts you will also have the ability to insert a contacts Name and Phone number if selected. This information will be added to the contact record to provide more details. This information is not required.

Business Rule for Missing Information
To specify the number of webinars a contact is allowed to attend without providing a phone number first enable the toggle and then select the number of webinars between 0-9

Marketing Parameters
When creating a link it may be important to your business practices to track marketing efforts. Narware has the ability to append custom marketing parameters to the Smart Link common to standard marketing practices. These parameters include UTM Source, UTM Medium, UTM Campaign, UTM Term, UTM Content and we include ability to track an emailing list ID if applicable.
To enable a UTM value click the checkbox next to the parameter you wish to use and enter in the value. After exiting the field by selecting anywhere else on the page the Smart Link example will be updated to include the appended UTM parameter.

Using the Suppression URL
Required Tags and Suppression Tags
The Required Tags and Suppression Tags sections are used to define tags that a Contact is required to have or not have in order to Register, Join or be sent to the No Available Webinar URL for the defined Smart Link.

Use/Copy the Example Smart Link
After understanding and completing the steps above to support your webinar Smart Link configuration that supports your business you can now verify that the insertemail , insertname , insertphone supports the dynamic variable that is supported by your messaging tool to insert the needed information for identifying the list of contacts sent the link.
| Messaging Tool | |||
| Active Campaign | %EMAIL% | %FULLNAME% | %PHONE% |
| AWeber | {{subscriber.email}} | {{subscriber.name}} | |
| Go High Level | {{contact.email}} | {{contact.name}} | {{contact.phone}} |
| Kartra | {email} | {first_name}_{last_name} | |
| Keap | ~Contact.Email~ | ~Contact.FullName~ | ~Contact.Phone1~ |
| Klaviyo | {{email}} | {{person.full_name}} | {{person.phone_number}} |
After inserting the correct Email Variable into the link and possibly the Name and Phone variables Save the configuration by selecting “Save” then select the copy button on the right side of the Example Smart Link.
Paste it into your email, text or messaging tool for the third party to dynamically insert the related information of your contacts being sent the link.